本文最后更新于:2025年4月13日
一、数据准备 已知有一个实体类Employee,其内部包含如下的属性:序号(id)、员工号(employeeId)、员工姓名(employeeName)、年龄(age)、性别(gender)、生日(birthday)
根据上述内容,我们将上述内容转化成Java实体类Employee(包名:com.icode504.entity)。
在这个实体类中每一个属性使用@ExcelProperty修饰,作为表格文件中每一列的表头:
1
2
3
4
5
6
7
8
9
10
11
12
13
14
15
16
17
18
19
20
21
22
23
24
25
26
27
28
29
30
31
32
33
34
35
36
37
38
39
40
41
42
43
44
45
46
package com.icode504.entity;import com.alibaba.excel.annotation.ExcelProperty;import lombok.*;import java.util.Date;@AllArgsConstructor @NoArgsConstructor @Getter @Setter @ToString public class Employee {@ExcelProperty("序号") private Integer id;@ExcelProperty("员工号") private String employeeId;@ExcelProperty("员工姓名") private String employeeName;@ExcelProperty("年龄") private Integer age;@ExcelProperty("性别") private Character gender;@ExcelProperty("生日") private Date birthday;
根据上述实体类,创建一个长度为10的数据列表,这里我创建一个工具类EmployeeUtils:
1
2
3
4
5
6
7
8
9
10
11
12
13
14
15
16
17
18
19
20
21
22
23
24
25
26
27
28
29
30
31
32
33
34
35
36
37
38
39
40
41
42
43
44
45
46
47
48
49
50
51
package com.icode504.utils;import com.icode504.entity.Employee;import java.util.*;public class EmployeeUtils {private static final String[] employeeArray = {"小陈" , "小李" , "小吴" , "小孙" , "小张" , "小徐" , "小马" , "小赵" , "小刘" , "小王" };public static List<Employee> getDataList () {new ArrayList <>();Random random = new Random ();Calendar calendar = Calendar.getInstance();for (int i = 0 ; i < employeeArray.length; i++) {Employee employee = new Employee ();1 );8 ) + 1995 ,12 ) + 1 ,28 ) + 1 );2 ) == 1 ? '男' : '女' );return employeeList;public static String getFilePath () {return "E:\\Code\\icode504-codespace\\easyexcel-demo01\\src\\main\\resources\\" ".xlsx" ;
至此,我们的数据列表准备完毕。
二、Excel相关知识 Excel是微软公司开发的一款电子表格软件,被广泛用于数据分析、财务管理、统计报表等各种应用场景,通常用于创建、编辑和管理电子表格。
Excel文件通常以.xlsx(Excel 2007及以后版本)或者.xls(Excel 2003及之前版本)的文件格式保存。
一个Excel文件可以包含一个或多个工作表(也称为工作簿),每个工作表都是一个电子表格,由行和列组成,交叉处是单元格,可以输入文字、数字、公式等数据。
每一个单独的Excel文件称作工作簿WorkBook (如下图所示):
一个工作簿中可以包含多个工作表WorkSheet (如下图所示):
单元格是工作表的基本组成单位,用户可以在单元格中输入文字、数字、公式等内容,并且可以对单元格添加样式(例如:调整字体大小、填充单元格颜色、给单元格添加边框等等):
三、将数据列表通过EasyExcel写入到Excel 将数据通过EasyExcel框架写入到Excel文件中,主要有如下几种方式:
方式一:链式写法 要想实现数据写入到Excel文件,需要实现如下步骤:
flowchart TD
	id1[调用EasyExcel静态方法write,并配置文件信息、字节码等参数]
	id2[在上述基础上继续调用静态方法sheet,配置工作表信息]
	id3[在上述基础上继续调用静态方法doWrite,配置数据并输出到Excel文件中]
	id1:::someclass --> id2:::someclass --> id3:::someclass
	classDef someclass fill:#66ccff, stroke-width: 2px, stroke: #000, backgroundColor: #66ccff
按照上述步骤,我们将上述工具类中提供的列表数据写入到Excel文件中。
在test\java目录下创建一个测试类EmployeeDemo1(包名:com.icode504.test),在这个测试类中创建一个测试方法testExcelWrite1:
1
2
3
4
5
6
7
8
@Test public void test () throws Exception {String filePath = EmployeeUtils.getFilePath();"模板" )"数据成功写出到Excel文件中" );
此时在resources目录下生成了一个时间戳命名的文件,双击打开:
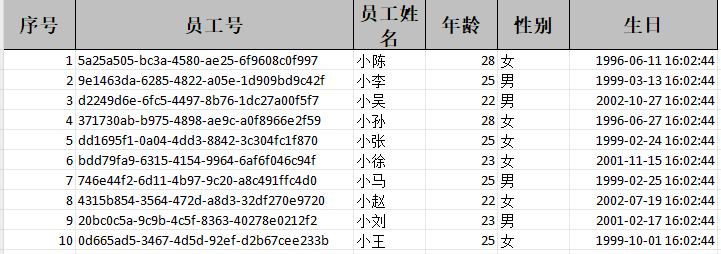
此时我们发现数据已经成功写入到Excel文件中:
注意:你生成的Excel数据中员工号、年龄、性别、生日和我下方的图片是不同的,因为再工具类中我将上述字段对应的数据都设置成了随机的。每运行一次代码,生成的数据都不相同。
如果你打开Excel文件时,“生日”一栏显示######,只需要将鼠标移动到生日一列,向右拉动即可查看日期信息。
方式二:doWrite中使用Lambda表达式(适用于JDK 8及以上的版本) JDK 8版本的一大特性就是匿名内部类对象可以使用Lambda表达式代替(匿名内部类中只能有一个方法),我们可以在doWrite方法中使用Lambda表达式代替:
1
2
3
4
5
6
7
8
9
10
11
@Test public void test () throws Exception {String filePath = EmployeeUtils.getFilePath();"模板" )return EmployeeUtils.getDataList();"数据成功写出到Excel文件中" );
同样可以正常输出文件,并且数据成功写到Excel文件中。
以上述代码为例,doWrite方法之所以能编写Lambda表达式是因为其参数类型是Supplier<Collection<?>>,Supplier接口头部由@FunctionalInterface修饰,是一个函数式接口,这类接口要求当前接口中有且只能有一个抽象方法,这种方式最大的好处将匿名内部类对象写成Lambda表达式。
方式三:try-with-resources写法(适用于JDK 7及以上的版本) JDK 7起支持try-with-resources写法,我们可以将EasyExcel中的逻辑写到try-with-resources中,步骤如下:
flowchart TD
	id1[在try的小括号中创建一个ExcelWriter对象,即调用EasyExcel类静态方法write,在方法内配置参数]
	id2[在try块中调用EasyExcel类的静态方法writeSheet并配置参数,创建WriteSheet对象]
	id3[ExcelWriter对象调用write方法,在此方法中配置数据和WriteSheet对象]
	id1:::someclass --> id2:::someclass --> id3:::someclass
	classDef someclass fill:#66ccff, stroke-width: 2px, stroke: #000
在try块中(小括号)调用EasyExcel类的静态方法write并配置参数,并在这个方法中创建一个ExcelWriter对象。
创建一个WriteSheet对象,配置工作表的信息。
ExcelWriter对象调用write方法,并在write方法中配置要导出的数据等配置。
1
2
3
4
5
6
7
8
9
10
@Test public void test () {String filePath = EmployeeUtils.getFilePath();try (ExcelWriter excelWriter = EasyExcel.write(filePath, Employee.class).build()) {WriteSheet writeSheet = EasyExcel.writerSheet("模板" ).build();"数据成功写出到Excel文件中" );
探究:使用try-catch-finally替换的方式是否可行 既然能使用try-with-resources写法,那么普通的try-catch和在方法上抛出throws是否能达到同样的效果呢?
只使用try-catch数据无法写入文件中,示例代码如下:
1
2
3
4
5
6
7
8
9
10
11
12
@Test public void test () {String filePath = EmployeeUtils.getFilePath();try {ExcelWriter excelWriter = EasyExcel.write(filePath, Employee.class).build();WriteSheet writeSheet = EasyExcel.writerSheet("模板" ).build();catch (Exception e) {"数据成功写出到Excel文件中" );
此时我们运行这个程序,发现它的确是在resources目录下确实生成了一个Excel文件,但是我们打开后发现这个Excel文件中并没有实际的数据写入。为什么会产生上述原因?
这里我们就要详细谈一下try-catch-finally和try-with-resources的区别了:
表面上看,二者的区别相差不大,都可以处理异常,只不过try-with-resources更加简洁。二者的主要区别在于文件资源管理类的处理方式不同:
对于普通的try-catch-finally,我们在try块中写可能抛出异常的代码,在catch块中捕获并处理这些异常,无论try块是否由异常,最终都会走finally块的代码。以文件资源处理类FileInputStream为例,读取一个文件以后,无论是否抛出异常,最终都需要在finally块中关闭,示例代码如下:
1
2
3
4
5
6
7
8
9
10
11
12
13
14
15
16
17
18
FileInputStream inputStream = null ;try {new FileInputStream ("demo.txt" );byte [] buffer = new byte [1024 ];while (inputStream.read() != -1 ) {new String (buffer, 0 , buffer.length));catch (IOException e) {finally {try {if (inputStream != null ) {catch (IOException e) {
虽然这样可以正常处理一个文件内容读入,但是在finally块中又嵌套了一个try-catch,里面又嵌套了一个if,代码就显得十分臃肿!
为了解决上述问题,JDK 7引入了try-with-resources语法糖,用于实现了AutoCloseable和Closeable接口的文件资源类自动关闭流的操作 。这样做的好处就是我们不需要再手动写finally块关闭资源。
使用try-with-resources时,文件资源在try块的小括号内声明并初始化,无论try块中是否发生异常,在try块执行结束后自动关闭流。如果这个资源类中实现了AutoCloseable和Closeable接口,在关闭资源流时会自动调用重写的close方法。
接下来我们就来自定义一个类PigInputStream,实现Closeable接口,任意定义几个方法并重写原接口中的close方法:
1
2
3
4
5
6
7
8
9
10
11
12
13
14
15
16
17
18
19
20
21
22
23
24
25
26
27
28
29
30
31
32
33
package com.icode504.service;import java.io.Closeable;import java.io.IOException;public class PigInputStream implements Closeable {public PigInputStream () {public void eat () {"猪猪吃饭" );public void treat () {"猪猪的产后护理" );public void run () {"猪猪以每小时80迈的速度向大树撞去" );@Override public void close () throws IOException {"执行关闭操作" );
接下来编写一个我们使用try-with-resources创建对象,并调用实例方法:
1
2
3
4
5
6
7
8
9
try (PigInputStream pigInputStream = new PigInputStream ()) {int i = 1 / 0 ;catch (Exception e) {
从输出结果可以直接验证try-with-resources可以自动调用类中已经重写的close方法(前提是实现了Closeable/AutoCloseable接口)。这种写法确实可以省去finally块中再次执行close方法,可以简化部分代码。
接下来我们还可以验证try-with-resources是否是语法糖。使用Intellij IDEA打开编译过程中的字节码,即可查看反编译的内容(如下图所示):
通过反编译的内容我们发现,还是正常执行原有try-catch-finally。和反编译的代码相比,源代码更加简洁。使用语法糖的目的就是高效编写代码,提高代码可读性,让代码编写更加容易。
上面说了这么多try-catch-finally和try-with-resources的区别,那么我们接着将目光转到EasyExcel第三种方式:为什么使用普通的try-catch无法将数据写入到Excel文件。
1
2
3
4
5
6
7
8
9
10
11
12
@Test public void test () {String filePath = EmployeeUtils.getFilePath();try {ExcelWriter excelWriter = EasyExcel.write(filePath, Employee.class).build();WriteSheet writeSheet = EasyExcel.writerSheet("模板" ).build();catch (Exception e) {"数据成功写出到Excel文件中" );
其实问题出在try块中真正将数据写入到Excel文件的代码excelWriter.write(EmployeeUtils.getDataList(), writeSheet);中,Ctrl +鼠标左键 点击write方法可以发现返回类型是ExcelWriter:
Ctrl +鼠标左键 点击ExcelWriter,我们发现这个类本身实现了Closeable接口:
这个类中已经存在重写的close方法:
因此,使用try-with-resources方式时,执行完excelWriter.write(EmployeeUtils.getDataList(), writeSheet);代码以后,会自动调用excelWriter.close();方法(不需要我们来调用)了,这一步主要是关闭IO流,确保文件正常输出。
再将目光返回到普通的try-catch的代码,我们会发现一个问题:在调用完EasyExcel相关的方法后,我们并没有手动将文件流关闭,数据并没有正常写入到表格文件中,解决上述问题的方式是在原有的基础上再添加一个finally块来执行资源关闭的操作,调整后的代码如下:
1
2
3
4
5
6
7
8
9
10
11
12
13
14
15
16
@Test public void test () {String filePath = EmployeeUtils.getFilePath();ExcelWriter excelWriter = null ;try {WriteSheet writeSheet = EasyExcel.writerSheet("模板" ).build();catch (Exception e) {finally {assert excelWriter != null ;"数据成功写出到Excel文件中" );
再次执行这段代码,发现resources目录下正常输出文件,并将原有的数据写入到Excel文件中:
方式四:不创建对象写入Excel文件 上述几种方式我们都使用到Employee实体类,但是在有些时候我们不需要实体类,只提供表头信息以及对应的数据列表,示例代码如下所示:
1 2 3 4 5 6 7 8 9 10 11 12 13 14 15 16 17 public static List<List<String>> getHead () {new ArrayList <>();new ArrayList <>();"字符串" );new ArrayList <>();"数字" );new ArrayList <>();"日期" );return list;
为什么表头信息方法设计成List<List<String>>类型,主要有以下两个原因:
EasyExcel中AbstractParameterBuilder类中提供了一个head方法(返回类型是一个泛型),这个方法目前只支持两种类型参数:List<List<String>>或Class<?>
1 2 3 4 5 6 7 8 9 10 public T head (List<List<String>> head) {return self();
设计成这种类型的优点是:在导出的Excel表中,每一列可能存在多个表头(如下图)
1 2 3 4 5 6 7 8 9 10 11 12 13 14 15 public static List<List<Object>> getNoModelDataList () {new ArrayList <>();Random random = new Random ();for (int i = 0 ; i < 10 ; i++) {new ArrayList <>();"字符串" + i);new Date ());return list;
如果使用前面方式一的链式写法,由于目前我们并没有实体类,因此在静态方法write中只需要传如文件信息参数,并在此基础上调用head方法传入表头列表,后续内容和方式一写法基本相同,示例代码如下:
1
2
3
4
5
6
7
8
9
10
11
@Test public void test () {String filePath = EmployeeUtils.getFilePath();"测试工作表" )"数据成功写出到Excel文件中" );
导出的Excel文件包含表头信息和数据列表:
文章参考:浅谈 Java 中的 AutoCloseable 接口
四、知识点总结 使用EasyExcel将数据写入到Excel文件的三种方式的知识点总结如下图所示: